
type
status
date
slug
summary
tags
category
icon
password
📚 POD Resources
本页汇总了 POD Resources 相关的常见问题(共 5 个)
▶ How to create a simple POD Product Base
This article is for POD Providers. If you are a merchant looking to use POD
products, or looking to create a product base, please check **Product Bases**.
A simple POD Product Base is the most common type of product setup in
Customily. It’s most common use is for garments such as t-shirts, hoodies,
onesies, and similar items that:
- Have one print area (usually the front).
- Offer color options (e.g., black, white, red).
- Offer size options (S, M, L, XL, etc.), but these do not affect the print file or the preview.
Because the print area stays the same across all variants, you only need to
create one print file and one mockup. Adding colors and sizes becomes simple
variant options in the product configuration.
This article will guide you step by step through creating a simple POD Product
Base. It's the best way to understand how product bases work, and take it from
there.
Creating a new POD Product Base
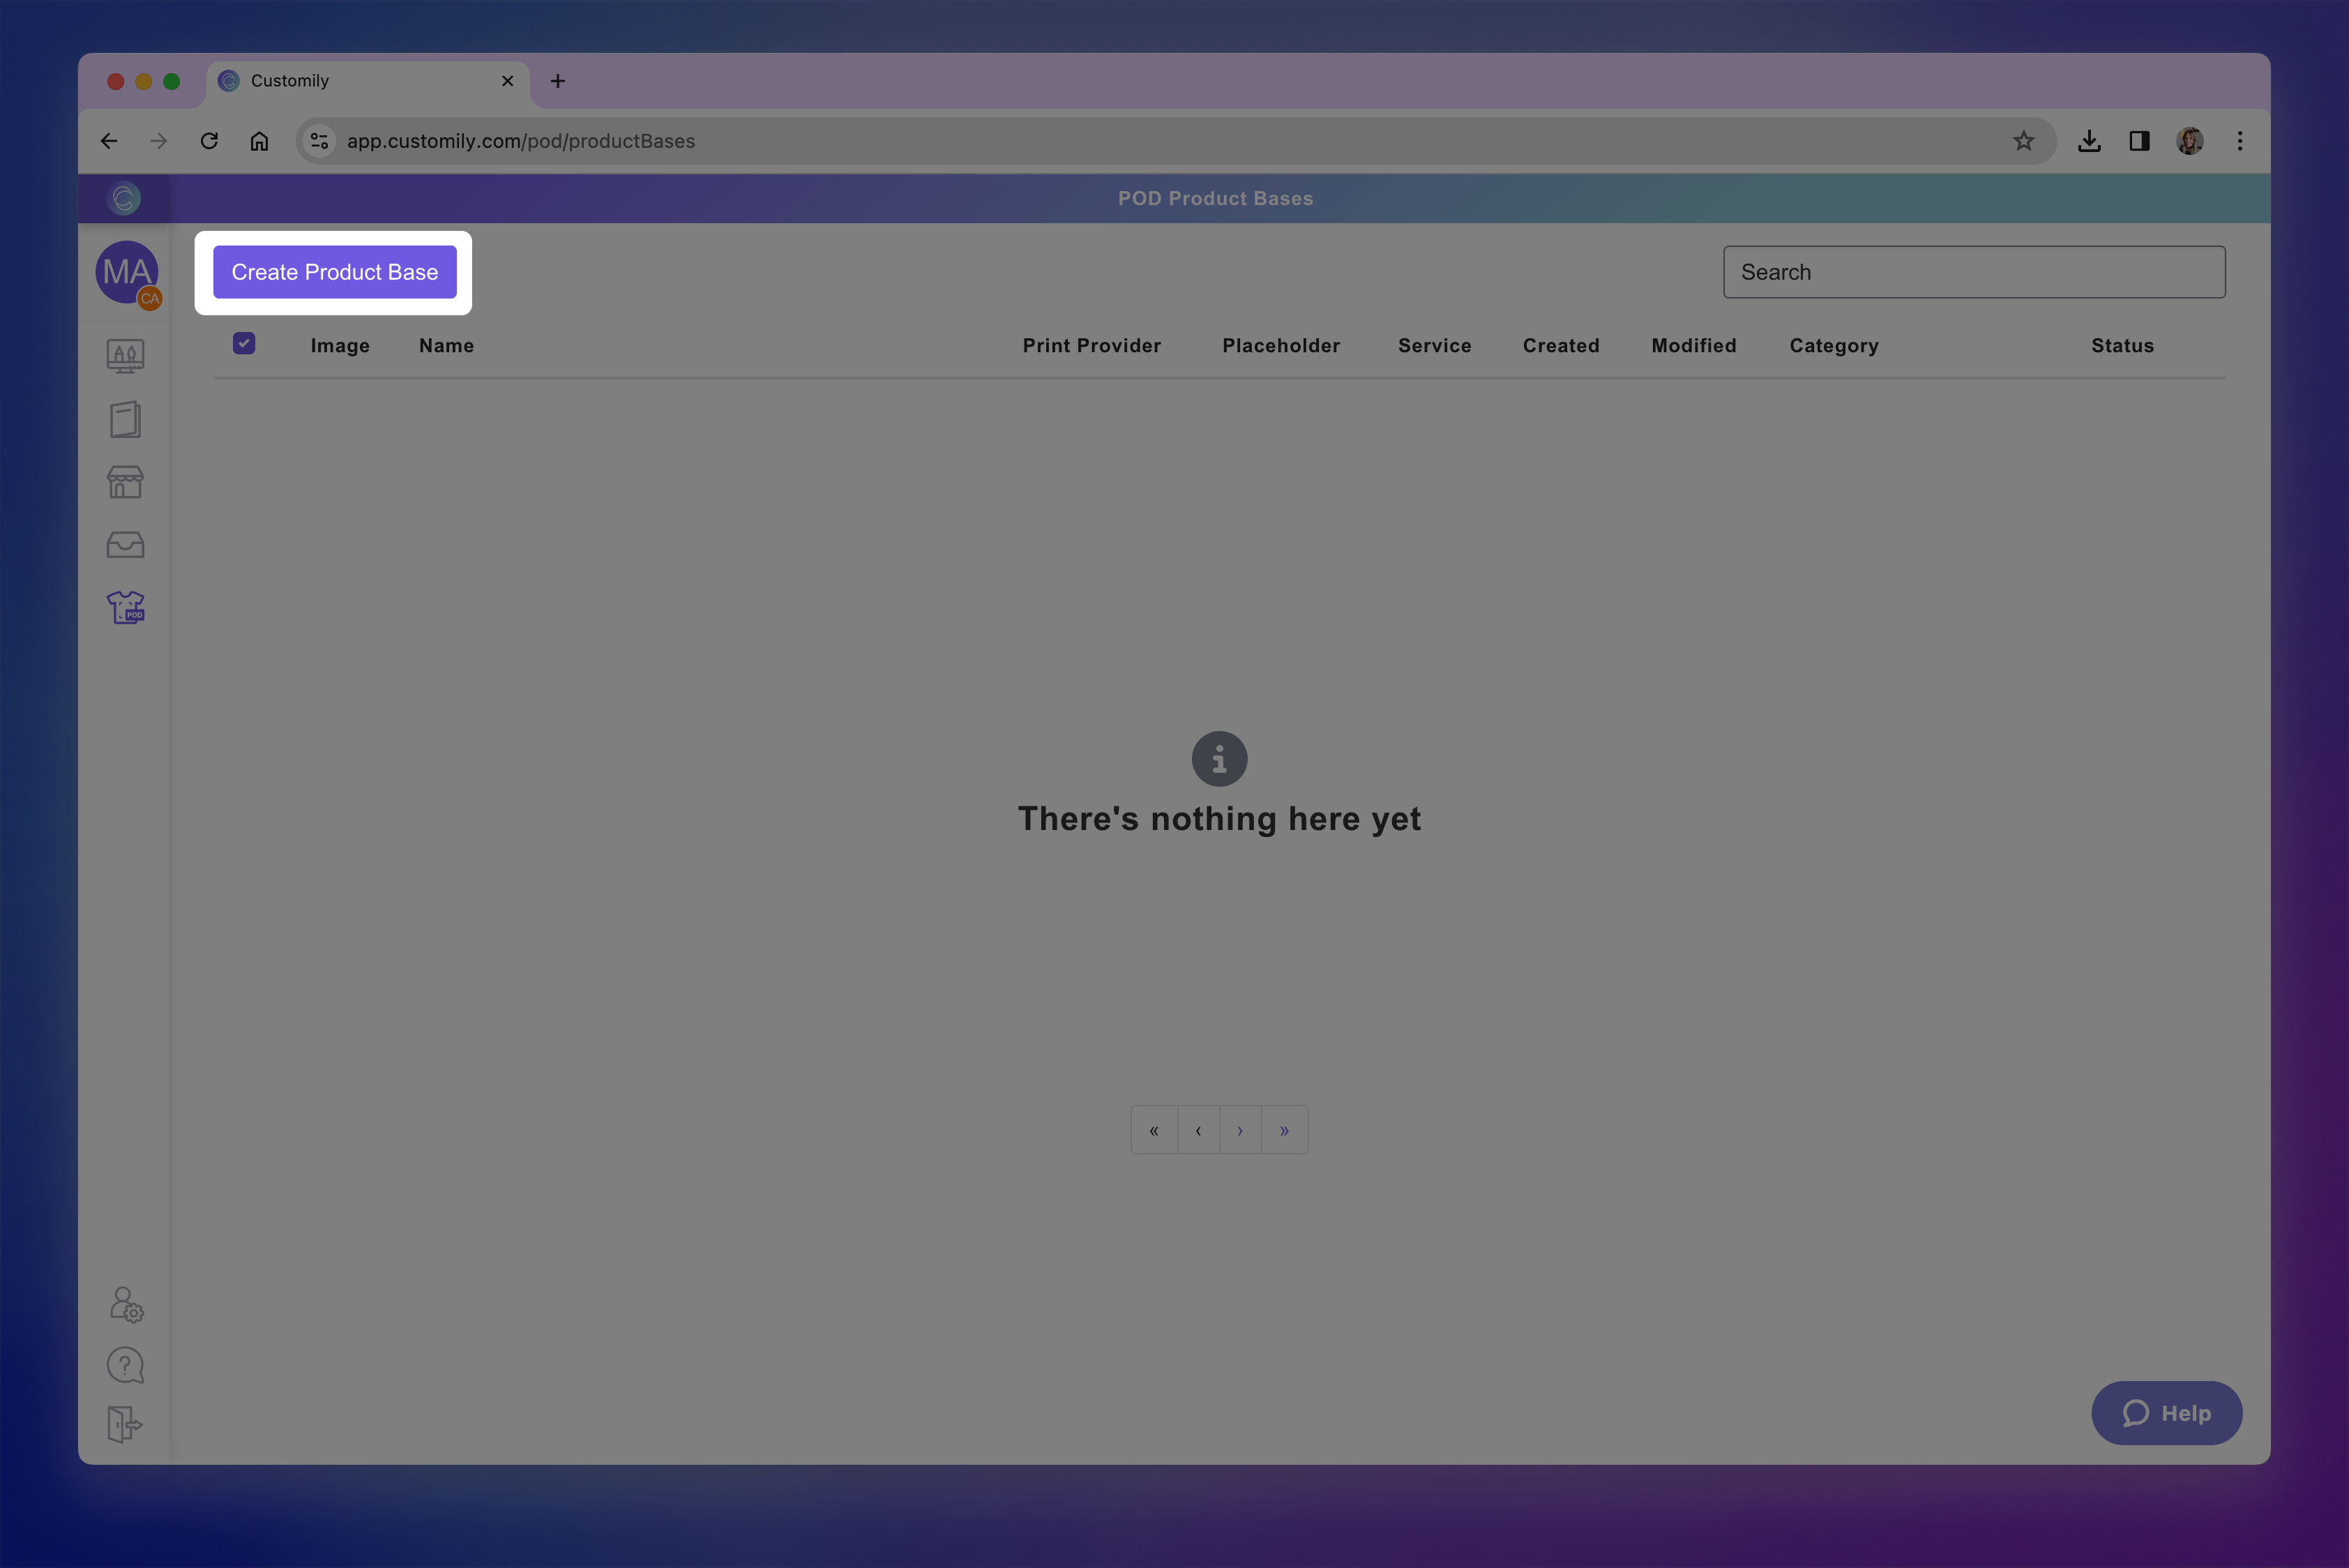
- Go to POD Product Bases
Open the left menu and go to POD Product Bases.
- Create a new product base
Click Create Product Base and then click Set Up Manually under your
provider info.
Create product base.png**
- Enter the product name
Make the name clear and easy to identify, as this is the name that will be
visible to merchants.
- Add print file dimensions
Add the print file dimensions of the product and click Create Page. Make
sure to add the full size needed for the print file, including margins, bleed,
crop marks, or any extra space required.
If your product comes in different print sizes, pick one to start.
Check how to create a POD Product Base with different sizes below to learn how
to add the other sizes afterwards.
- Adjust the print area
The print area is the zone where merchants can put their design. Think of
the print area as a bounding box: it defines exactly where the designs can be
placed, and nothing can go outside it.
The Print Area will be created automatically to fill the entire page size
you defined earlier, but you can adjust it to match your product requirements
if needed. Simply select it and resize and reposition it on the canvas, or
with the transform toolbox.
You can resize the print area to:
→ Leave margins or no print zones (for example, if your print file requires blank space around the edges).
→ Limit design placement to a specific area of the page.
- Add product guidelines
Click Add Product Guidelines to add a visual aid that helps merchants
understand the safe areas of a product. They are particularly useful for
products with unusual shapes (like stars, hearts, or circular ornaments),
products that have bleed (like posters or canvases), products that have cutout
or covered zones (like phone cases), or products that have stitching or folds
(like all-over print garments, pouches, etc.). Guidelines are never printed on
the final file.
- Add print marks (if needed)
Click Add Print Marks to add permanent elements that are exported with the
final production file, on top of whatever design merchants use. Print marks
are useful when the file requires cutting lines, crop marks, or other fixed
indicators for manufacturing. Unlike guidelines, print marks always appear in
the final print file.
- Configure print file settings
Use the panel on the right to configure the print file output. Choose the
format (PNG, JPG, PDF, EPS, AI, DXF), set the resolution for image formats,
pick the color mode for PDF or vector formats, and enable mirroring if
required for processes like heat transfers.
- When your print file is configured, click Next to move on to the mockup creation, which is what shoppers will see when they browse your product in your store. You'll see a blank canvas, with the print area, product guidelines and print marks (if you added any) placed in the middle. And a Product Colors layer so you can add your product pictures to build the mockup.
- Upload mockup images
Select the Product Colors layer and click \+ Add Image Option to add
blank images of your product to use for the mockups.
If the product comes in multiple colors or materials, upload one image for
each variant. Make sure all images are the same (or very similar), as the
print area will be positioned once and reused across all images.
The uploaded image(s) will be displayed on the canvas on the product colors
layer.
Pro Tip
Name your image files with the exact variant names you want (e.g. asphalt.jpeg, black.jpeg, burgundy.jpeg, etc.). Customily will automatically
use those names when creating the product variants.
- Position the print area on the mockup
Drag, resize, and rotate the print area over your product image to place it
exactly where the print area will be printed. This ensures designs are placed
in the correct spot, aligned with how the product will be produced.
**If you added product guidelines to your product, then it's easier to select
both layers, the print area and product guidelines and reposition them
together. You can select multiple layers using Shift.**
Pro Tip
If you need help aligning the print area on your mockup, you can upload a
photo of the finished product as a Dynamic Image to use as a guide. This
works best if the product photo is taken from the same angle as your blank
mockup image.
- Click Add Dynamic Image and upload the reference photo.
- Resize and position it so it overlaps your blank product image.
- Adjust your print area to match the placement in the photo.
- Delete the reference image once you’re done — it should not remain in the final mockup.
▶ What is a POD Product Base
This article is for POD Providers. If you are a merchant looking to use POD
products, or looking to create a product base, please check **Product Bases**.
POD Product Bases are products that Print-on-Demand providers upload directly
into Customily. They allow merchants to personalize your products and sell
them in their stores without extra setup work.
By managing your own POD product bases, you ensure your catalog is accurate,
variants are properly linked, and personalization previews look exactly as
they should.
How It Works
When you create or edit a POD Product Base:
- You add product print specifications, print areas, variants, mockups and details.
- Variants are linked with your POD provider’s variants so orders flow correctly.
- Merchants see the product ready to use in their Customily app.
- You can return and edit the product base at any time to keep it updated.
- * *
How to Create a POD Product Base
Click on a guide below to learn how to create the right kind of POD Product
Base for your products:
- How to create a simple POD Product Base: For products with one print area in a single size , with either a single color or multiple color variants — like t-shirts, hoodies, onesies, mugs, tumblers, or tote bags.[](https://help.customily.com/hc/en-us/articles/41012295478683)
- How to create a POD Product Base with different print sizes: For products where the printable dimensions vary by size or shape — like canvases or posters in multiple formats, ornaments in different shapes (circle, star, heart), or phone cases for different models.[](https://help.customily.com/hc/en-us/articles/41124598738715)
- How to create a POD Product Base with multiple print areas (i.e: front and back): For products with more than one customizable area on the same item — like t-shirts with front and back prints, mugs with left and right panels, or all-over print items with multiple panels.
- How to create a POD Product Base for Engraving: For products where designs are engraved instead of printed, requiring vector-based or single color output — like jewelry, metal tumblers, cutting boards, or leather goods.
- How to add a new variant to an existing POD Product Base (coming soon)
- How to edit a POD Product Base (coming soon)
▶ How to create a POD Product Base with different print sizes
This article is for POD Providers. If you are a merchant looking to use POD
products, or looking to create a product base, please check **Product Bases**.
A POD Product Base with different print sizes is useful when the product
requires multiple print files because the printable area changes depending on
size or shape. Unlike simple products (like t-shirts or hoodies) where one
print area applies across all variants, these products need a unique setup for
each size or version.
This type of setup is commonly used for:
- Products that scale in size, like canvases or posters, where each size has different proportions.
- Products with different orientations , like landscape or portrait.
- Products with multiple shapes , such as ornaments that come in circle, star, or heart designs.
- Products where size changes with the model or use case , like phone cases for different phone models.
By creating multiple print sizes within the same POD Product Base, you ensure
that each variant has the correct print file while still being grouped
together as one product for merchants to use.
Creating a new POD Product Base with multiple print sizes
The first steps are the same as creating a simple POD Product Base, but we’ll
go through them again here for clarity.
- Go to POD Product Bases
Open the left menu and go to POD Product Bases.
- Create a new product base
Click Create Product Base and then click Set Up Manually under your
provider info.
Create product base.png**
- Enter the product name
Make the name clear and easy to identify, as this is the name that will be
visible to merchants.

- Add print file dimensions
Add the print file dimensions for the first size or shape of the product and
click Create Page. Make sure to add the full size needed for the print
file, including margins, bleed, crop marks, or any extra space required.

- Adjust the print area
The print area is the zone where merchants can put their design. Think of
the print area as a bounding box: it defines exactly where the designs can be
placed, and nothing can go outside it.
The Print Area will be created automatically to fill the entire page size
you defined earlier, but you can adjust it to match your product requirements
if needed. Simply select it and resize and reposition it on the canvas, or
with the transform toolbox.
You can resize the print area to:
→ Leave margins or no print zones (for example, if your print file requires blank space around the edges).
→ Limit design placement to a specific area of the page.
- Add product guidelines
Click Add Product Guidelines to add a visual aid that helps merchants
understand the safe areas of a product. They are particularly useful for
products with unusual shapes (like stars, hearts, or circular ornaments),
products that have bleed (like posters or canvases), products that have cutout
or covered zones (like phone cases), or products that have stitching or folds
(like all-over print garments, pouches, etc.). Guidelines are never printed on
the final file.

- Add print marks (if needed)
Click Add Print Marks to add permanent elements that are exported with the
final production file, on top of whatever design merchants use. Print marks
are useful when the file requires cutting lines, crop marks, or other fixed
indicators for manufacturing. Unlike guidelines, print marks always appear in
the final print file.
- Configure print file settings
Use the panel on the right to configure the print file output. Choose the
format (PNG, JPG, PDF, EPS, AI, DXF), set the resolution for image formats,
pick the color mode for PDF or vector formats, and enable mirroring if
required for processes like heat transfers.

- When your print file is configured, click Next to move on to the mockup creation, which is what shoppers will see when they browse your product in your store. You'll see a blank canvas, with the print area, product guidelines and print marks (if you added any) placed in the middle. And a Product Colors layer so you can add your product pictures to build the mockup.
- Upload mockup images
Select the Product Colors layer and click \+ Add Image Option to add
blank images of your product to use for the mockups.
The uploaded image(s) will be displayed on the canvas on the product colors
layer.
If your product comes in multiple colors or materials
Upload one image for each variant. Make sure all images are the same (or very similar), as the print area will be positioned once and reused across all
images.Name your image files with the exact variant names you want (e.g. asphalt.jpeg, black.jpeg, burgundy.jpeg, etc.). Customily will automatically
use those names when creating the product variants.
- Position the print area on the mockup
Drag, resize, and rotate the print area over your product image to place it
exactly where the print area will be printed. This ensures designs are placed
in the correct spot, aligned with how the product will be produced.
**If you added product guidelines to your product, then it's easier to select
both layers, the print area and product guidelines and reposition them
together. You can select multiple layers using Shift.**
If your product has bleed or crop marks, make sure you align them properly
with the mockup.

Pro Tip
If you need help aligning the print area on your mockup, you can upload a
photo of the finished product as a Dynamic Image to use as a guide. This
works best if the product photo is taken from the same angle as your blank
mockup image.
- Click Add Dynamic Image and upload the reference photo.
- Resize and position it so it overlaps your blank product image.
- Adjust your print area to match the placement in the photo.
- Delete the reference image once you’re done — it should not remain in the final mockup.
▶ How to create a POD Product Base with multiple print areas
This article is for POD Providers. If you are a merchant looking to use POD
products, or looking to create a product base, please check **Product Bases**.
A POD Product Base with multiple print areas is used for products that can
be customized in more than one place. Each print area will be generated as a
separate print file. It’s most common for items such as t-shirts, hoodies,
mugs, or other products that:
- Have two or more print areas (e.g., front and back, or left and right sides) that come in separate print files.
- May offer color options (e.g., black, white, red).
- May also offer size options (S, M, L, XL, etc.), but these do not affect the print file or the preview.
Because these products allow personalization in several areas, you’ll need to
set up a multiple print files inside one product. Colors and sizes can
still be added as variants in the product configuration.
This article will guide you step by step through creating a POD Product Base
with multiple print areas, so your previews and print files stay accurate no
matter where the design is applied.
Keep in Mind
If you create a product with multiple print areas (for example, Front and Back), the system will always generate all print files — even if a
merchant only offers one side to be personalized. So if a shopper personalizes
just the front, the order will still include an empty file for the back.
If you want merchants to be able to choose only Front , only Back , or
Front and Back , you need to create separate product bases :
- One for Front only
- One for Back only
- One with both Front and Back (multi–print area)
This approach also lets you create the most accurate previews. For example:
- A Front-only product can use a mockup showing just the front of the t-shirt.
- A Back-only product can use a mockup showing just the back.
- A Front-and-Back product can use a mockup showing both views.
This distinction doesn’t apply to products like all-over prints (AOP) ,
where you always need all print files. In those cases, just create one product
base with multiple print areas.
Creating a POD Product Base with multiple print files.
- Go to POD Product Bases
Open the left menu and go to POD Product Bases.
- Create a new product base
Click Create Product Base and then click Set Up Manually under your
provider info.
Create product base.png**
- Enter the product name
Make the name clear and easy to identify, as this is the name that will be
visible to merchants.
- Add print file dimensions
Add the print file dimensions for the first print area you want to work with
and click Create Page. Make sure to add the full size needed for the print
file, including margins, bleed, crop marks, or any extra space required.
- Adjust the print area
The print area is the zone where merchants can put their design. Think of
the print area as a bounding box: it defines exactly where the designs can be
placed, and nothing can go outside it.
The Print Area will be created automatically to fill the entire page size
you defined earlier, but you can adjust it to match your product requirements
if needed. Simply select it and resize and reposition it on the canvas, or
with the transform toolbox.
You can resize the print area to:
→ Leave margins or no print zones (for example, if your print file requires blank space around the edges).
→ Limit design placement to a specific area of the page.
- Add product guidelines
Click Add Product Guidelines to add a visual aid that helps merchants
understand the safe areas of a product. They are particularly useful for
products with unusual shapes (like stars, hearts, or circular ornaments),
products that have bleed (like posters or canvases), products that have cutout
or covered zones (like phone cases), or products that have stitching or folds
(like all-over print garments, pouches, etc.). Guidelines are never printed on
the final file.
- Add print marks (if needed)
Click Add Print Marks to add permanent elements that are exported with the
final production file, on top of whatever design merchants use. Print marks
are useful when the file requires cutting lines, crop marks, or other fixed
indicators for manufacturing. Unlike guidelines, print marks always appear in
the final print file.
- Add another print file
Click the Add Print file button.
!add page.pngEnter
the dimensions for the new print file, just as you did for the first one
(again make sure to include the full printable area, including margins or bleed if required), and click Create Page.
Repeat this process for each additional print area the product requires.
- Configure the new print file
A new print file page will be created. Same as before, it comes with its own
print area filling the page. If needed, adjust the print area to match the
exact printable zone of this new file, and add guidelines or **print
marks** , just as you did for the first file.
Tip
The design studio shows one page at a time. Use the **Layers panel on the
right** to switch between pages and manage each print area separately.
- Rename your print files (optional)
Double-click the print file name in the Layers panel to rename it (for example, Front or Back). This name will be visible to merchants, so
use clear names to help them choose which areas of the product to offer for
personalization.
- Configure print file settings
Use the panel on the right to configure the print file output. Choose the
▶ How to create a POD Product Base for Engraving
A POD Product Base for Engraving is used for products where designs are
engraved instead of printed. It’s most common for items such as jewelry,
tumblers, cutting boards, leather goods, and similar products that:
- Have one or multiple engraving areas.
- May offer color or material options (e.g., silver, gold, wood, leather).
- May also offer size options
In this guide, we’ll show you how to create a product with **one size and one
engraving area. If you need to set up products with multiple sizes** that
affect the engraving file or preview, check the article on creating a POD Product Base with different sizes. If your product can be engraved multiple areas,
and you need a separate engraving file for each, see the article on creating a POD Product Base with multiple print areas.
Creating an engraved POD Product Base
- Go to POD Product Bases
Open the left menu and go to POD Product Bases.
- Create a new product base
Click Create Product Base and then click Set Up Manually under your
provider info.
Create product base.png**
- Enter the product name
Make the name clear and easy to identify, as this is the name that will be
visible to merchants.
- Add print file dimensions
Add the print file dimensions of the product and click Create Page. Make
sure to add the full size needed for the print file, including margins, bleed,
crop marks, or any extra space required.
If your product comes in different print sizes, pick one to start.
Check how to create a POD Product Base with different sizes below to learn how to
add the other sizes afterwards.
- Adjust the print area
The print area is the zone where merchants can put their design. Think of
the print area as a bounding box: it defines exactly where the designs can be
placed, and nothing can go outside it.
The Print Area will be created automatically to fill the entire page size
you defined earlier, but you can adjust it to match your product requirements
if needed. Simply select it and resize and reposition it on the canvas, or
with the transform toolbox.
You can resize the print area to:
→ Leave margins or no print zones (for example, if your print file requires blank space around the edges).
→ Limit design placement to a specific area of the page.
- Add product guidelines
Click Add Product Guidelines to add a visual aid that helps merchants
understand the safe areas of a product. They are particularly useful for
products with unusual shapes (like stars, hearts, or circular ornaments),
products that have bleed (like posters or canvases), products that have cutout
or covered zones (like phone cases), or products that have stitching or folds
(like all-over print garments, pouches, etc.). Guidelines are never printed on
the final file.
- Add print marks (if needed)
Click Add Print Marks to add permanent elements that are exported with the
final production file, on top of whatever design merchants use. Print marks
are useful when the file requires cutting lines, crop marks, or other fixed
indicators for manufacturing. Unlike guidelines, print marks always appear in
the final print file.
- Configure print file settings
Use the panel on the right to configure the print file output. Choose the
format (PNG, JPG, PDF, EPS, AI, DXF), set the resolution for image formats,
pick the color mode for PDF or vector formats, and enable mirroring if
required for processes like heat transfers.
- When your print file is configured, click Next to move on to the mockup creation, which is what shoppers will see when they browse your product in your store. You'll see a blank canvas, with the print area, product guidelines and print marks (if you added any) placed in the middle. And a Product Colors layer so you can add your product pictures to build the mockup.
- Upload mockup images
Select the Product Colors layer and click \+ Add Image Option to add
blank images of your product to use for the mockups.
The uploaded image(s) will be displayed on the canvas on the product colors
layer.
If your product comes in multiple colors or materials
Upload one image for each variant. Make sure all images are the same (or very similar), as the print area will be positioned once and reused across all
images.Name your image files with the exact variant names you want (e.g. asphalt.jpeg, black.jpeg, burgundy.jpeg, etc.). Customily will automatically
use those names when creating the product variants.
- Position the print area on the mockup
Drag, resize, and rotate the print area over your product image to place it
exactly where the print area will be printed. This ensures designs are placed
in the correct spot, aligned with how the product will be produced.
**If you added product guidelines to your product, then it's easier to select
both layers, the print area and product guidelines and reposition them
together. You can select multiple layers using Shift.**
Pro Tip
If you need help aligning the print area on your mockup, you can upload a
photo of the finished product as a Dynamic Image to use as a guide. This
works best if the product photo is taken from the same angle as your blank
mockup image.
- Click Add Dynamic Image and upload the reference photo.
- Resize and position it so it overlaps your blank product image.
- Adjust your print area to match the placement in the photo.
- Delete the reference image once you’re done — it should not remain in the final mockup.
- Set the engraving color
Select the print area on your mockup, then expand the Color toolbox on
the right-hand panel. Choose a color for the print area — this will be the
color used to represent the engraving in the preview.
Whatever design shoppers place in that area will be displayed in the color you
- 作者:EcomGrace
- 链接:https://www.ecomgrace.com/article/2d935142-581f-815c-9196-caa767f0a5d8
- 声明:本文采用 CC BY-NC-SA 4.0 许可协议,转载请注明出处。